Mango Halwa

IMG_2997

Mango Halwa

I’m sharing an easy and popular recipe for your next holiday gathering. I found the original here, and tweaked it slightly to suit my family’s tastes. This halwa can be made using grated paneer or ricotta cheese. While the ricotta gives a creamier taste, it took longer to cook. Simmer the halwa mixture for about 20-30 minutes for regular texture, and around 45 minutes for a fudge  texture (which is what we love).

IMG_2991

Mango Halwa

Mango Halwa

(Serves 10-12)

  • 1 (30 oz) can mango pulp – about 3.5 cups
  • 12-14 oz block paneer [OR] 30 oz ricotta cheese (about 4 cups of one)
  • 2.5 cups sugar
  • 2 cups dry milk powder
  • 1 tsp cardamom powder [OR] 2 tsp rose water
  • ghee to grease your serving platter
  • chopped nuts, saffron, silver leaf, etc for topping & presentation
  1. Finely grate the paneer if you are using it.
  2. Using a wide heavy-bottom pan (preferably non-stick or anodized), bring the mango pulp, cheese and sugar to a boil on medium-high flame.
  3. Once it reaches a boil, reduce flame to medium and simmer for about 20 minutes till mixture thickens, stirring frequently and making sure it doesn’t stick to the bottom of the pan.
  4. Add the cardamom powder or rose water and the milk powder for thickness. Mix well. Cook for another 5-10 minutes and pour into a flat greased platter to cool.
  5. Alternately, continue cooking an additional 15 – 20 minutes if you like a thicker, fudge-like consistency. Then add the milk powder and flavoring, and cook for another 5-10 minutes and pour into your platter to cool.
  6. Spoon into individual bowls and top with nuts and serve.

NOTE: Make sure the pan is atleast 4-5 inches deep as this mixture will splatter as it thickens and simmers. Also, DO NOT ADD sugar mid-way unless you plan on increasing the cooking time significantly (yes, I learnt this the hard way!). The sugar will dilute your mixture and you will have to cook it down again – it’s like starting from scratch. Paneer gives the halwa more texture while ricotta makes it more creamy.

IMG_2993

Mango Halwa

Gluten-Free & High-Fiber Millet Upma

Millet Upma

Farmed thousands of years ago & revered in ancient texts, Millet is an ancient grain tracing it’s roots to the Far East. According to Bob’s Red Mill Natural Foods, ‘Unlike most other grains, this versatile, gluten free grain is alkaline, which makes it easy to digest and helps balance the body’s natural tendency towards acidity.’

  • Millet is also gluten free, protein rich & is an excellent source of dietary fiber.
  • It is anti-oxidant rich & provides a significant source of necessary minerals:
    • phosphorous
    • potassium
    • magnesium which reduce effects of migraines & heart attacks
    • Niacin (vit B3) which helps lower cholesterol & triglycerides
  • While comparable to semolina in calories & carb count, millet has a lower glycemic load meaning that its high fiber & low simple sugar composition produces lower blood sugar levels than rice.
  • Millet helps foster healthy gut bacteria, and the serotonin is calming to the mood.  (all info from www.Care2.com).

Millet looks like large quinoa, and is sometimes mistaken for it. This whole grain can be used as a healthier alternative to rice and can be cooked both savory or sweet. My friend Uma gave me this idea and given the health benefits and easy of preparation, it will definitely be a staple in my pantry.

Millet Upma

Gluten-Free & High-Fiber Millet Upma

(Makes about 6 cups; serves 4-5)

  • 2 cups hulled millet (not pearled)*****
  • 1/3 cup vegetable oil
  • 1 big onion (chopped fine)
  • 8-10 green chillies
  • 1 inch ginger (grated) [or] 1 1/2 Tbsp ginger paste
  • 1 medium tomato (chopped fine)
  • 1 medium potato (diced into small pieces)
  • 1 large carrot (diced)
  • 1/2 cup peas
  • 1 1/2 tsp salt (or to taste)
  • 1/2 tsp turmeric
  • 2 Tbsp lemon / lime juice
  • 1/4 cup chopped cilantro
  • 3 1/2 cups water
  1. Heat a large heavy bottom pan on medium flame, and add oil.
  2. When oil heats up, add the onions, chillies and the ginger and fry till the onions start to slightly brown, stirring frequently.
  3. Add tomatoes and saute till they are soft, about 2 minutes.
  4. Add the carrots, potatoes, peas, salt & turmeric and stir fry for 3-5 minutes on medium-high flame.
  5. Add the water and bring to a boil.
  6. Immediately add the millet, stir everything well and return to boil.
  7. Reduce flame, cover and allow to simmer for about 20 minutes on low flame. Do not lift lid midway to check.
  8. Remove from heat, stir and recover; allow the millet to sit for about 10 minutes.
  9. Add the lemon juice & cilantro and stir before serving.

EASY method: Season directly in a pressure cooker pan, roast the vegetables for only 2 minutes, add water and millet, and cover. Cook on medium flame for 2 whistles. Allow to rest for about 15 minutes before opening and adding cilantro & lime juice.

***** Hulled millet is still a whole grain which is ‘shelled’ / just the bran removed – a realistic way of humans being able to consume it. Pearled millet is more processed and polished to make cooking times lower.

Steamed Savory Oats Patties with Yogurt Sauce (Oats Nucchina Unde)

Would you believe me if I told you that you guys are always on my mind? Really!! Summer was extremely busy and I just haven’t gotten back on track with a more diciplined routine yet. I must say though that I’ve lined up a ton of interesting recipes to share with you.  I’m always thinking of HolyKhao readers and all the posts I should have made but haven’t. I know the saying ‘Actions speak louder than words’, but in my case, I implore you to put that aside and apply “It’s the thought that counts‘ :)).

Lakshmi Puja in early September & last week’s Ganesha Chaturthi heralded the start of festival season for Hindus and more celebrations like Halloween, Thanksgiving & Christmas in the USA. Unfortunately, for me, this means the start of carb overload. After finally accepting that my husband and I can’t have diets like we did when we were younger, but being reluctant to give up taste, I’m working on tweaking traditional recipes to make them a little healthier. Of course, every time it’s a success, I’ll be sharing it here :))

Nuchina Unde

Nucchina Unde is a traditional Karnataka food that is made by steaming seasoned dal, and can be eaten plain, with chutney or a yogurt curry. My aunt had mentioned that her friend had made this version with oats, but I was skeptical. Since she swore that it was delicious, I figured I’d give it a try. Let me just say that I was not disappointed! The patties tasted almost like the authentic dal ones, and were easier to make as it requires no soaking. I’ve made it thrice for recipe testing, and it has been a great breakfast and tea time snack, and my 11-year old has wolfed down quite a few.  I grew up eating these plain with a generous dollop of homemade ghee, and it was only after I got married that I learnt that typically, nucchina unde is served with a yogurt & vegetable curry called Majjige Huli or Paladya. My version here is quick, no-cook, flavor-filled and small enough for this batch.

Nuchina Unde

Oats Nucchina Unde

Steamed Savory Oats Patties with Yogurt Sauce

(Makes 12-14)

  • 1 cup rolled oats (toast lightly & cool)
  • 1 Tbsp all purpose flour / maida
  • 1 Tbsp rice flour
  • 1/2 – 1 cup finely chopped dill
  • 5-6 curry leaves
  • 1/4 bunch cilantro
  • 4-5 red or green chillies (I like the taste of red, but it does make your mix darker in color)
  • 1/2 inch ginger
  • 1/2 cup coconut
  • 1/2 tsp salt ( or to taste)
  • 1 tsp lemon juice
  1. Coarsely pulse the oats in a blender / food processor jar. It should not be fine, and it’s okay to have some whole oat flakes.
  2. Add the maida & rice flour and mix well. Set aside.
  3. Blend the curry leaves, cilantro, chillies, ginger & coconut in a small blender jar, adding  just 2-3 Tbsp of water. (save jar for blending sauce ingredients.)
  4. Add the masala, dill, salt & lime juice to the oats and gently mix well.
  5. Set aside for 15 minutes to soak up the moisture and flavors.
  6. Take rounded tablespoons full of oats mixture and gently roll into 2-inch logs (Do not press too hard or the patties will be very dense).
  7. Place on a greased steamer plate / idli stand and steam for 13-15 minutes.
  8. Serve hot or at room temperature. (I have reheated them in the microwave with no loss of taste or texture.)

Nuchina Unde

Yogurt Sauce

(Makes about 1 cup)

  • 1/4 cup fresh grated coconut
  • 1/2 inch ginger
  • 2-3 green chillies
  • 5-6 sprigs cilantro
  • 2 Tbsp roasted channa dal (daliya) – this keeps the sauce from separating
  • 1/2 tsp black mustard seeds (sasive) – optional but it give the sauce a wonderful flavor
  • 1/2 tsp salt
  • 1 cup yogurt (or around 1/2 – 2/3 cup buttermilk)
  1. Make a fine paste of the coconut, ginger, cilantro, chillies, channa, mustard seeds and a few teaspoons of yogurt in a small blender jar.
  2. Add the rest of the yogurt and give it a quick blend to incorporate everything.
  3. Remove to a serving bowl and add salt.

For Seasoning

  • 1 tsp oil
  • 1/2 tsp black mustard seeds (this is necessary for seasoning)
  • pinch of asafetida (hing)
  • 5-6 curry leaves
  1. Heat a small pan on medium flame and add oil.
  2. Add the mustard seeds and cover till it stops sputtering.
  3. Add the hing & curry leaves and cover partially, shaking the pan to crisp the curry leaves.
  4. Remove from heat and pour over the sauce.

Quinoa Breakfast Bars

Quinoa Breakfast Bars

How many of you spent the summer with kids who were constantly eating – because they were starving after hours at the pool, because their friends were over and wanted a snack, they wanted to try a new concoction, or they were just plain bored because you took away their electronics? My kids had more than their fill of junk food over the last few months, and there was not much I could do about it when extended family visiting for a few months and there was constant entertaining.

Quinoa Breakfast Bars

Fast forward to mid-August: the guests leave and my college bound child – who is suddenly on a gym routine – announces that he needs lots more protein than he gets at home! The 11-year old on a growth spurt eats like there’s no tomorrow. Husband says he’d like to take something from home to keep the 3p.m. vending machine run at bay. I just want something that can be eaten without utensils and feels like a treat but is also healthy for my family. These Quinoa Bars to the rescue! I made these the first time without any recipe, and you can do the same too. The amounts and ingredients below are just a guide (as are many of my other recipes). Feel free to substitute what you have on hand and adjust quantities to suit your taste. For example, add coconut flakes if you like the taste. Substitute almonds with walnuts (or mix a little of both!). Replace cranberries with cherries or even raisins if that’s what you have on hand. I’ve used a whole 15 oz bag of milk chocolate chips but you could reduce it or switch it up with dark / semi-sweet / white chocolate.

With school back in session and after school events looming around the corner, breakfast and grab-and-go snacks that are easy, tasty and good for you are a blessing. These bars keeps for a couple of weeks in the refrigerator.

Quinoa Breakfast Bars

(Makes 16 bars 2-inch X 2-inch bars)

  • 1 cup quinoa
  • 1/2 cup dates (chopped)
  • 1/2 cup figs (chopped)
  • 2 tbsp flax seeds
  • 2 tbsp chia seeds
  • 1/2 cup almonds (or walnuts) – chopped
  • 1/2 cup cranberries (or cherries / tart raisins)
  • 1/2 cup pumpkin seeds (or sunflower seeds)
  • 1-2 tbsp coconut oil
  • 2 cups chocolate chips of choice
  1. In a heavy bottom pan, lightly toast the quinoa over medium flame for few minutes. It will pop and lightly puff. Remove from heat & cool completely. (Do not brown.) – I feel this removes the slight bitter taste, but feel free to use raw if that’s what you prefer. 
  2. In a heavy duty food processor, add the dates, figs and coconut oil and pulse till it becomes finely processed.
  3. Add the cooled quinoa, flax, chia, almonds and half of the cranberries & pumpkin seeds. Pulse until all the ingredients are finely chopped and mixed well.
  4. Line an 8X8 pan with wax paper and press the mixture into the pan. Level the top using the back of a flat spoon or dish.
  5. Melt chocolate chips according to package directions and pour evenly over the mixture and spread.
  6. Set in the refrigerator for an hour or so to set and firm up. Cut into 16 pieces. The bars keep for atleast 2 weeks in the refrigerator.

Click here for recipes for No-Cook Oats & Dates Breakfast Bars and No Bake Oatmeal Peanut Butter Bars

Easy Mixed Vegetables & Greens Curry

Green Curry

This is a family friendly recipe that we’ve enjoyed for many years. Quick, easy & nutritious, it was given to me by my friend Akhila. We did some measuring of ingredients over lunch and some girl talk last week – it’s good to have girlfriends who’ll cook for you and let you vent all afternoon :). Thanks Akhila.

Green Curry

Easy Mixed Vegetables & Greens Curry

(Serves 4-5)

  • 2 medium onions (finely chopped)
  • 2 medium tomatoes (finely chopped)
  • 1 small cinnamon stick (broken)
  • 4-5 whole cloves
  • 1 tsp red chilli powder (or to taste)
  • 1 medium potato (washed and diced into small pieces)
  • 1/3 cup peas / lima beans
  • 3-4 firm small eggplants (chopped medium size) – You can use the long indian variety too, but it does get a little mushy
  • 4 cups chopped green beans (about large pea size pieces)
  • 1-2 cups fresh spinach leaves (washed, drained & roughly chopped)
  • 1 cup chopped dill
  • 1/2 – 3/4 cup water
  • salt to taste
  • 2 tbsp oil
  1. In a wide heavy bottom pan, heat oil over medium-high flame and add the cinnamon & cloves. Saute for a few seconds.
  2. Add onions and fry till just starting to brown.
  3. Add tomatoes and cook till soft – about 2-3 minutes.
  4. Add green beans and saute for 2 minutes.
  5. Add the potatoes & lima beans and saute for another 2 minutes.
  6. Add eggplant, chilli powder & salt and continue cooking for an additional 2 minutes.
  7. Mix in the spinach & dill, add water sparingly and cook covered till all the vegetables are done.
  8. Serve with rice or flatbread like naan / roti / chapatis.

Pressure Cooker Method

  1. Follow steps 1-3 as above.
  2. Add all the vegetables, salt & chilli powder and fry for 2-3 minutes.
  3. Add the spinach & dill, and 1/2 cup water and mix well.
  4. Cover pressure cooker lid and cook on medium for just 1 whistle.

Spicy Cilantro Lime Salad Dressing

Cilantro Lime Dressing

For someone who loves to drown their salad with ranch dressing and cannot stand vinaigrettes, finding a recipe for a thicker dressing that wasn’t too tart/sweet/unhealthy has been a challenge. Playing around with ingredients a few days ago, I finally made something that was fresh, packs a bite and is full of fresh healthy whole ingredients. Serve with Naan Pizzas (recipe here) for al fresco dining on summer nights.

Naan Pizza

Cilantro Lime Dressing

The dressing is really simple to make.

  • ! medium bunch cilantro (rinsed, drained & chopped)
  • 1 small garlic clove (washed & peeled)
  • tiny piece ginger (washed & peeled)
  • 1-2 green chillies (to taste)
  • 1 tsp cumin (jeera)
  • juice from 1 lime
  • 4 tbsp olive oil
  • salt to taste

Blend all ingredients in a small blender jar and adjust taste to liking, adding more oil by the tbsp if dressing is too thick.

The salad shown in the photo has arugula, red onion, tomato, cucumber, carrots & red pepper. Use any combination of veggies and protein – top with chickpeas, tofu, paneer, grilled chicken, red meat, etc.

Cilantro Lime Dressing

Naan Pizza

Naan Pizza recipes have been around for a while & I’m joining the bandwagon. If only I had known how easy this meal would be. I had dinner on the table in under 30 minutes, and it was really delicious!

Naan Pizza

I’m all for convenience and used store bought naan but you make it from scratch if you like. (You can try this Naan recipe here with over 1500 reviews!!) As for toppings, our pizzas show ground turkey but you can use any protein of your choice – tandoori / rotisserie chicken, shrimp, paneer, tofu or even just veggies like mushrooms, broccoli, tomatoes, onions, etc. The recipe below is more of a guide and can be customized as you like.

My kids preferred a plain base, but you can start by spreading a spoon of pizza sauce, green chutney, etc before topping with meat, veggies and cheese.

Serve a fresh salad with Cilantro-Lime Dressing to make an easy and tasty summer meal. Click here for recipe.

Cilantro Lime Dressing

Naan Pizza

For meat / paneer topping:

  • 1 lb ground meat OR drained & crumbled paneer or tofu
  • 3 tbsp onion powder (or 1 medium onion, chopped)
  • 1 tsp garlic powder (or 1 tsp garlic paste)
  • 1 tsp ginger powder (or 1 tsp ginger paste)
  • 1/2 tsp cinnamon powder
  • 1/2 tsp cloves powder
  • 1/2 tsp turmeric
  • 1 tsp coriander (dhania) powder
  • 1 tsp red chilli powder (or to taste)
  • salt
  • lemon juice
  • 2 tbsp oil

1) Heat oil in a wide pan on medium flame.

2) Add all the spice powders and quickly stir for a few seconds, allowing it to get frothy or ‘bloom’ (If using fresh onion, ginger & garlic – add them to the oil first and saute till just starting to brown. Then add the spice powders.)

3) Add the ground protein and mix well with the spices. Continue cooking on medium-high heat, stirring frequently to break up lumps and ensure even cooking.

4) Cook about 10 minutes and adjust salt. Top with lemon juice. Remove from heat and set aside.

For the pizza:

  • 1 cup shredded mozzarella cheese (if you can lay hands on AMUL cheese at the Indian store, definitely use it.)
  • 4 fresh / frozen naans of your choice (I used frozen garlic naan from Trader Joe’s)
  • 1 small red onion – finely sliced (optional)
  • green chili and mint / cilantro chutney (optional)
  • few sprigs of cilantro – finely chopped (optional)

1) Preheat the oven to 400*F

2) Lay naans on a baking sheet and top with 1 tsp of sauce or chutney of choice.

3) Spread a 1/4 of the topping mixture on the naan and spread evenly. Top with sliced onions if desired.

4) Now top with 1/4 cup cheese and place in the oven for about 3-4 minutes till cheese is melted.

5) If you want a crunchy crust (delicious!), remove the pizza from the baking sheet and gently slide directly onto the oven rack; cook for another 2-3 minutes.

6) Carefully slide onto serving plate and top with fresh chopped cilantro before serving.

(My son enjoyed it with a drizzle of Maggi Hot & Sweet sauce.)

[Gas Grill Method: preheat grill on high for 10 minutes. Lightly brush each naan with oil and grill for about 30 seconds per side. Remove to a plate and reduce grill heat to medium-low. Top naan with your choice of ingredients and grill covered for another 5-6 minutes till cheese is melted.)

Tandoori-Spiced Tawa Macchi (Shallow-Fried Fish)

Tandoori-Spiced Tawa Macchi

After a long break and a crazy-busy summer with family visiting from India, I’m back again with a quick and easy recipe that will wow your eyes & taste-buds. This shallow-fried whole fish fry cooks in minutes and can be customized to suit your tastes – the possibilities are endless. The recipe below is more of a guide – feel free to use masalas / seasoning of your choice, making it as spicy or as mild as you like.

I used a homemade tandoori masala mix that I wrote down in my recipe book about two decades ago when Indian stores were not so common in America. The recipe is from Martha Stewart (can’t remember the actual source as it’s been so long).

Tandoori-Spiced Tawa Macchi

Tandoori Masala

  • 1/2 cup yogurt
  • 1 tbsp ginger paste
  • 1 tbsp garlic paste
  • 1/2 – 1 tbsp red-chilli powder (to taste)
  • 1/2 tsp cinnamon powder
  • 1/2 tsp cloves powder
  • 1 tsp cumin (jeera) powder
  • 1 tsp coriander (dhania) powder
  • 1 tsp salt (to taste)
  • 1/4 tsp pepper powder
  • 1/4 tsp cardamom powder
  • 1-2 tbsp lemon juice (to taste)
  • red tandoori food color – optional

1) Mix all ingredients together and adjust taste to preference. (I like to keep it spicier and a little saltier at this point as it mellows when used with the meat.)

Tandoori-Spiced Tawa Macchi

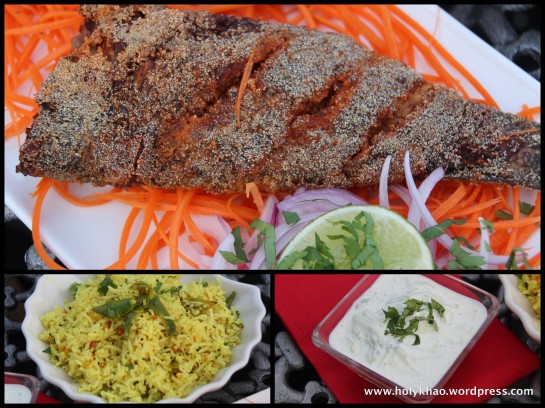
(I also fried a couple of silver pomfret fish but forgot to take photos. This was shot on my phone while my family waited at the table for dinner. So please excuse the bad photography.)

For the fish-fry

  • 2 lbs bass / pomfret / tilapia fish (about 3-4) – gutted, scaled & scored on the sides
  • tandoori-masala paste (above) or seasoning of choice
  • 1/3 cup fine semolina (sooji) – if all you have is regular, then run it in a small blender jar for a few seconds
  • 1 cup oil for frying
  • chaat masala – optional
  • lemon / lime wedges for topping & garnish

1) Thoroughly wash the fish and drain completely. Pat dry with paper towels and set on a flat plate.

2) Generously apply the tandoori masala paste in the scores on the skin and on the insides.

3) Cover the fish and refrigerate for at least 2-3 hours .

4) To fry, remove fish from refrigerator and allow to sit for 15-20 minutes at room temperature.

5) Pour about 1/4 cup oil into a flat, wide, heavy-bottomed pan and heat on medium.

6) Place semolina in a flat shallow plate/container and gently roll the fish to lightly coat.

7) Place the fish in the hot oil on its side and cook – carefully turning midway – about 4 to 5 minutes per side.

8) Drain and remove when the fish is golden and has a crispy coating.

9) Continue cooking the rest of the fish the same way, adding more oil as needed.

10) Sprinkle with chaat masala and a squeeze of lemon juice if desired. Serve with lemon / coconut rice and raita.

Tandoori-Spiced Tawa Macchi

For Lemon Rice

This is a traditional South Indian rice dish (chitranna  in Kannada) that is eaten at room temperature and is served with a side of vegetables. While not traditionally served with meat, I feel it lends itself well to easy, make-ahead summer meals. Plus the zesty lemon taste goes well with the spicy fish and the creamy raita.

  • 1/2 tsp mustard seeds
  • 1 tsp channa dal
  • 1 tsp urad dal
  • 4-6 thai green chillies (slit in half)
  • 1/2 tsp turmeric powder
  • salt to taste
  • juice of 1 lemon (or to taste)
  • 1/4 cup chopped cilantro
  • 1 cup cooked and cooled rice
  • 4 tbsp oil

1) In a small saucepan, heat the oil over medium flame.

2) Add mustard seeds and partially cover till they pop.

3) Add the chana dal, stir for a few seconds and then add udad dal. Stir till just starting to turn light brown.

4) Add the slit green chillies and cook about 30 seconds, partially covering lid so it doesn’t splatter oil onto your hands or face.

5) Turn off stove, add turmeric and stir. Allow to cool.

[This mix can be made a day or two ahead of time and stored at room temperature in an air tight container. Do not add salt or lemon juice as it will make the dals soft instead of keeping it crunchy and nutty.]

6) To serve, add the seasoning mixture, salt, lemon juice & cilantro to the rice and mix well.

(This is a basic version of lemon rice. Additions include curry leaves, capsicum, peanuts/cashews, peas, etc. My family happens to like the plain version.)

For Raita

  • 1/2 cucumber – peeled & grated / finely chopped
  • 1/2 cup sour cream / hung yogurt
  • salt to taste
  • cilantro for garnish

1) Mix all ingredients and serve chilled.

********

Murder & Masala Dosas

Apologies to all my blog readers for not posting a recipe this week. My parents, grandma and aunt are visiting from India and most of my extended family lives within an hour from home, making spontaneous family meals & sleep-overs a frequent occurrence. This means constant grocery shopping, cooking, cleaning, eating, gossip & laughs over many cups of tea. Add to the mix two whole days spent trying to get passports renewed, and some end-of-school activities for a child leaving elementary school and another graduating high-school (sniff!! sob!!) – my short-lived resolve to be more organized and prepared flew out the window without a whimper! Our 23rd anniversary and my husband’s birthday is this weekend – YAY!!!. I’ve experimented with a raw Cashew & Raspberry Cake for the occasion and will share the recipe next week if it is a hit (heck, I might share it even if it is a miss – it looks so pretty!!). In the meantime, I’m sharing some weekend reading if you are interested.  Enjoy your weekend folks.

The article is about P. Rajagopal, the founder of Saravana Bhavan – the famous South-Indian vegetarian chain restaurant. . Very interesting read.

MURDER & MASALA DOSAS

http://www.nytimes.com/2014/05/11/magazine/masala-dosa-to-die-for.html

Please visit and LIKE my Facebook page for more interesting articles, tips & videos that I might not share on the blog. It is also an easier and quicker way to contact & get replies from me as I check it more often.

www.facebook.com/HolyKhao

Cold Sesame Noodles in Spicy Peanut Sauce

Cold Sesame Noodles in Peanut Sauce

Warm weather meals and entertaining call for easy, make-ahead dishes that are light and tasty. I came across this recipe on the holidaykitchen.tv YouTube channel and made a few changes to suit our tastes. It is a good alternative to regular pasta salad as it doesn’t have any mayonnaise.

PS: Did you know that noodles are symbolic of longevity in China? It is considered inauspicious to cut a strand, and is traditionally served in as long a piece (strand?) as possible, especially on New Year’s Day.

Cold Sesame Noodles in Spicy Peanut Sauce

Cold Sesame Noodles in Peanut Sauce

(Serves 3-4)

  • 2 scallions / green onions
  • 1 clove garlic (grated)
  • 1 tsp grated ginger
  • 2 Tbsp soy sauce
  • 1 Tbsp sesame oil (strongly recommend using this as it gives a fantastic flavor, but feel free to substitute)
  • 1 Tbsp peanut oil
  • 1 tbsp red-wine vinegar
  • 1/3 cup creamy peanut butter
  • 1/3 cup toasted sesame seeds
  • 1 tsp sugar
  • 1 tsp (or to taste) red chilli flakes
  • Hot sauce (Sriracha / chilli-garlic sauce) to taste
  • 1/3 cup water
  • 6-8 oz of dry long pasta (spaghetti / angel hair / chinese noodles)
  • 1 cup broccoli florets (lightly salted & steamed & drained well) – optional
  • 1/2 cup shredded carrots – optional
  • 1/2 cup shredded chicken / steamed shrimp (optional)
  • 1/3 cup peeled, seeded & finely chopped cucumber – optional
  • cilantro, crushed roasted peanut, toasted sesame seeds for topping

1) Cook the noodles according to package directions. Rinse in cold water and drain completely. Allow to cool completely.

2) Add all ingredients to a small blender jar and process till smooth & creamy.

3) Toss with cold noodles, broccoli & carrots, and chicken/shrimp (if using) and set aside for an hour or two for all the flavors to meld.

4) Divide into serving bowls and top with chopped cucumber, crushed peanuts, a sprinkle of toasted sesame seeds & cilantro.